
")
")
")

")
")


Fast accepted Mining Cryptocurrency platform Pi coin Network is taking a big leap step toward mainnet migration. While today I will be explaining in this transcribed version of the video how to migrate your mined Pi coin to Mainnet, we’ll be going through the process of migrating your earned Pi coin mainnet Checklist, which is essential to complete for everyone that wishes to succeed in Pi coin crypto world.
Before you can able to transact with your Pi coin, you need to first transfer your Pi Transferable Balance and join the queued up for mainnet migration. This way, you will be able to join the Enclosed Mainnet Pi ecosystem where pioneers with real Pi in their Pi wallet can purchase goods and services with their Pi!
Table of Contents
Pi Coin to Mainnet
To get to the Mainnet Checklist, either tap the shortcut ‘’Mainnet info’’ at the bottom right corner of the home screen or go to your Pi mining app home screen and tap the hamburger icon on the top left
- To open up the Pi menu, then tap ‘’ Mainnet’’
- Tap ‘’Mainnet Checklist’’ from this page and you’re here!
- Overall, the Mainnet checklist is divided into 8 steps, listed below.
After step 7 is complete, your Transferable balance will be enabled to queue up for migration to the Mainnet blockchain. So follow up with me on the steps to migrate your mine Pi coin to mainnet
You can now Migrate Your Pi Coin to Mainnet
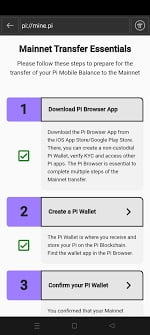
Step 1: Download the Pi Browser App
Essential ecosystem Pi coin Apps, such as the Pi wallet and the Pi KYC, are available on the Pi Browser, which can be downloaded from the IOS App or Google Play Store.
This is your one-stop access point for the Pi Ecosystem, where you will be able to spend Pi for goods and services and use Web 3.0 Pi apps whose backend interacts with the Pi Mainnet.
Step 2: Create a Pi wallet
Once migrated onto the Mainnet blockchain, your Pi transferable balance will be sent to your Pi wallet, located within the Pi Browser.
For a comprehensive walkthrough on how to create and use your Pi wallet, watch the Pi wallet tutorial video on the official Pi network YouTube channel.
Step 3: confirm your Pi wallet
Your Pi wallet is non-custodial in nature, which means that the Pi network does NOT have records of your wallet passphrase, which is needed for you to unlock your wallet.
Losing your wallet passphrase is thus akin to losing your entire wallet along with all assets inside. To ensure that you know your wallet passphrase, Step 3 requires you to enter it here.
Please remember to store the passphrase somewhere safe so that you do not lose or forget it and no one else has access to it.
Step 4: Commit to lockup configuration
By committing to a binding Pi coin lockup setting, you can start mining at a higher rate even before you migrate your Pi to Mainnet.
The longer the duration and higher the percentage of the total Pi you choose for your lockup settings, the higher your lockup mining reward will be.
The lockup reward is meant to support a healthy and smooth ecosystem and incentive long-term engagement with the network, while the network is bootstrapping the ecosystem and creating demands.
It is an important decentralized macroeconomic mechanism, especially in the early years of the open network when utilities are being created.
More information about the Pi coin lockup reward is available in the new chapters of the updated white paper that was released on December 28, 2021 (December Whitepaper).

While Pi lockups are voluntary, you must commit to an initial lockup setting to complete Step 4 of the Mainnet Checklist.
The ‘’binding’’ aspect of your lockup setting means that the lockup amount and duration cannot be lowered before the transfer of your balance to the Mainnet.
After your initial Mainnet transfer, the lockup setting for your next transfer duration and percentage will remain the same as your current one
And will be applied to your future migrations automatically, unless you change these settings. You can adjust the settings anytime between any two transfers to the Mainnet
The saved changes will be applied to any next transfer to the Mainnet, and it will not affect any previous lockups already transferred.
Step 5: Apply for KYC
KYC or Know Your Customer is a procedure to first identify and then verify Pioneer’s identities, comply with regulations and ensure that Pioneers within the global Pi Ecosystem are real individuals. The Pi KYC app on the Pi Browser is a native, decentralized solution to make KYC scaleable and financially accessible around the world.
It combines machine automation and crowdsourced hyper-local human verification to accomplish scalable, secure and efficient KYC. Please submit your KYC application on the Pi KYC app as an application slot becomes available.
Currently, slots are open to more than half of the network, and more work is being done to enable the rest of the network to receive KYC invitations.
Step 6: wait for KYC results
This step will be complete once your KYC application has been successfully verified. In rare cases, additional network checks performed right before Mainnet migration may revert the verified status to being unverified.
If this occurs, Pioneers may be presented with an option to resubmit the application, so please check the status of your KYC application and the next KYC step in the Pi KYC app.
Once you pass KYC, you are also welcome to apply to become a KYC validator on the Pi KYC app. While becoming a KYC validator is not required for your Mainnet migration,
It helps scale and expedite the KYC solution for the Pi whole community, and your validation work will be compensated in Pi coins.
Step 7: Migrate to Mainnet
After completing all the previous checklist steps, this step enables you to queue your Pi Transferable balance for Mainnet migration. This 7th step includes executing an acknowledgement document with your wallet passphrase.
Note that this passphrase has to be the same one that you confirmed in step 3., If for some reason you are not able to access your current passphrase or otherwise wish to change your wallet,
You can repeat steps 2 and 3, and then confirm the same wallet passphrase in step 7. After completing step 7, your Pi transferable balance will be queued to be sent to your Mainnet Pi Wallet address (also known as Mainnet migration ).
Unless additional network checks before the migration reverted your KYC verified status as mentioned before.
After the migration, there will be a 14-day pending period during which Pioneers Pi balance in their Mainnet wallet will not be available yet for transfer by the Pioneer,
Allowing the network to conduct additional checks or course corrections if necessary to clear the transfer.
When the pending period expires, the Pioneer will then be able to use their Pi within the current Enclosed Pi Mainnet.
Step 8: invite your referral team and security circle to KYC
Step 8 is technically not required for Mainnet migration. However, the Pi you’ve mined via your referral team or security circle members will only become a part of your Pi Transferable balance once these members pass KYC themselves.
Thus, inviting your referral team and security circle to KYC would make more of your Pi coin eligible for migration.
Having more Pioneers pass KYC‘ed and migrate helps the network progress in its Mainnet Migration and ecosystem building.
Therefore, it’s highly recommended that you remind your fellow Pioneers to pass KYC!
In conclusion, Pi Network has grown immensely in size and passion since its inception. See How to Boost and Increase your Pi Mining Rate in less than 24 hours
Now that Mainnet migration to the enclosed network has begun, we’re so excited for the Pi coin community to grow into a fully functional and thriving ecosystem on the Mainnet blockchain.
Therefore, we’re excited for more and more Pioneers to complete the Mainnet checklist
And help further develop the future of Pi Network.
Recommended Article
- See How to Create a Website in Less Than 10 Minutes
- ShareAsale Affiliate: Sign Up to Make Money & Enjoy $30 Per CPA Lead
- How to Start to Make Money $25 on 4 Sites to Get $100 Every day for 30 days
- CPAgrip vs CPAlead which is the best CPA to Make Money
- See How to Win Free Giveaway New iPhone, PS, Gift Card $750 Today
- How to Create a Website for Free in Less Than 20 Minutes
- 5 Website to Make Money with Surveys Online with your Phone
- How to Make Money Online with these 6 Mobile Apps (Enjoy Earning $2000 Daily
- How to Make Quick Money on Brad App (CashOut N14,500)
- Secret Behind Owodaily Success and How to Make N17,000
If you find any value from this article and you want your friends and families to benefit, please help them by sharing it on your social media platforms with the social media buttons below.
Your shares and likes motivate and encourage us to serve you with much more rich content like this. The kindness from you goes a long way to promote our website and articles to the world.
")